roofing
Roofing

Preparing For Roof Installation

Roof Installation Riverview is a significant undertaking that impacts the safety, efficiency and value of your home. To ensure a smooth process, prepare your house and driveway by parking vehicles away, covering landscaping with tarps, and temporarily moving items like mirrors and breakable wall decorations.

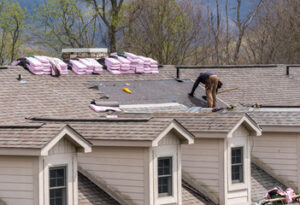
Contractors also install new drip edge and flashing (made of galvanized steel) in places like around vents, chimneys and roof valleys to prevent water penetrationroofing
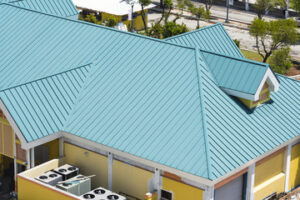
. They may also add features such as ridge vents and gutter systems.

The type of roofing material you choose has a major impact on the look, longevity, and energy efficiency of your roof. You’ll need to choose a material that fits your climate, your home’s architectural style, and your budget.

The substrate, or foundation, of your roof is what supports the roofing material and helps it withstand rain, snow, heat, and cold. It’s important to choose a quality substrate that is strong enough to support the weight of the roofing material and prevent moisture infiltration.

Wood substrates, like OSB (oriented strand board) and plywood, are common choices. They’re strong, lightweight, and affordable. They’re also moisture-resistant and work well with most shingle types.

Concrete is another common substrate, and it’s used on flat or low-sloped roofs. It’s fire-resistant and can withstand the weight of a lot of roofing materials, including metal. However, it’s not ideal for a homeowner with a tight budget as it’s more expensive and requires extensive labor to install.

After the substrate is prepared, a waterproof underlayment is laid to protect the roof against moisture infiltration. It’s typically rolled out horizontally across the roof and secured with nails. It’s also installed in the eaves, valleys, and around penetrations like chimneys, vents, and TV satellite dishes. In addition, ice and water shield is often applied in the eaves, valleys, around chimneys, and along the walls to help prevent ice dams and leaks.

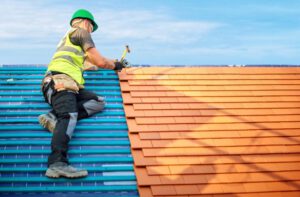
Shingles are an important roofing component that provides a finished look to a home’s exterior. They’re available in a wide range of colors and styles to suit any architectural style. Popular asphalt shingles include 3-tab shingles that are economical and fit well with most home styles, as well as dimensional and premium shingles that provide the look of other roofing materials like slate or cedar shakes.

Other roofing materials like standing seam metal or cedar shakes are more expensive, but they offer a more unique and attractive aesthetic. They’re also long-lasting and more durable than traditional shingle roofs.

Planning

Regardless of whether you’re building a new house or replacing the roof on an existing home, a comprehensive approach to the installation process is essential to ensuring durable and successful results. It’s important to choose a contractor that has extensive experience and knowledge of local building codes, roofing materials, and climate conditions. It’s also advisable to review the company’s track record and references before signing a contract. A well-drafted agreement outlines the scope of work, estimated costs, and timelines for completion.

Before the actual work begins, a professional will conduct a thorough inspection of the existing roof to assess its condition and identify any potential problems that need to be addressed. This includes inspecting the integrity of the structure, checking for leaks, and examining the condition of shingles or tiles. The inspector may also use tools such as infrared cameras to detect hidden moisture or a drone for an aerial view.

The next step is to install an underlayment, which provides an extra layer of protection against moisture and enhances the durability of the roof. This material is typically made of felt or a synthetic option, and it’s installed by cutting a slot along the ridge and securing it with nails. Additionally, flashing is installed to prevent water from getting into vulnerable areas such as around chimneys or vents.

Once the underlayment and flashing are in place, the main roof is laid. This is the element that’s most visible to the homeowner, and it’s done with care and precision. For asphalt shingles, the shingles are staggered and nailed in. For metal roofs, the panels are screwed into place. A top-notch roofer will ensure that the seams are properly overlapped to prevent leaks and that all nail heads are covered.

Finally, proper ventilation is installed to help regulate temperature and lower cooling demands. Attic vents such as ridge vents, turbines, and soffit vents are installed in strategic locations to promote airflow. Additionally, overhanging branches are trimmed to minimize the risk of damage during storms and high winds. Proper ventilation also helps reduce energy bills and protects against mold and mildew growth.

Inspection

As a part of the installation process, a roofing professional will conduct a comprehensive inspection. This ensures that all aspects of the roof are up to standards, from the quality of the materials to the precision of the installation. The inspection will also cover any areas that need repair or replacement, allowing the homeowner to address them promptly before they become bigger problems.

During the inspection, the roofing professional will look at the condition of the shingles, underlayment, and flashing. They will also check for any sagging or bending, which could indicate structural damage to the roof. In addition, they will examine the eaves, attic, and all supporting structures to make sure they are in good condition.

The inspection will also include checking the ventilation system. This is an important step because it helps to reduce moisture build-up, which can lead to mold and rot. The roof ventilation system may include ridge vents, turbines, powered exhaust or gable vents, and solar fans. The inspection will also include examining the attic for any signs of leaking, such as water stains on the ceiling or insulation that appears damp.

If any issues are identified, the roofing contractor will provide a detailed report of the findings. This will include recommendations for repair or replacement, as well as cost estimates. The report will also include suggestions for preventive measures that can help to extend the lifespan of the roof. For example, regular cleaning of gutters and the removal of overhanging branches can significantly reduce the risk of wear and tear.

Having a properly installed and maintained roof will not only add value to your home, it will also help you avoid expensive repairs or even major replacements in the future. For this reason, it is a good idea to schedule regular inspections by a qualified roofing contractor. Not only will this help you avoid costly repairs in the future, it will also allow you to plan your budget more effectively and avoid unpleasant surprises.

Installation

It is important to understand that roof installation requires a more extensive process than simply adding shingles over an existing structure. This is because a new roofing system should include the proper underlayment, flashing details, and attic ventilation to ensure long-term performance and compliance with local building codes. Moreover, attic ventilation and insulation are essential to the overall comfort of the living environment in a home and prevent moisture buildup that can lead to mold growth, wood damage, and other structural issues. Moreover, they can also regulate indoor temperature and reduce energy consumption by minimizing heat loss in the winter and heat gain in the summer.

Roof Installation
Roofing

Important Steps in Roof Installation

A new roof is a significant investment. But it’s also one of the best ways to protect your home from damage, deterioration, and costly repairs.Roof Installation

The roof installation process involves many different steps. Following your roofing contractor’s preparation instructions (such as removing wall decor and covering fragile items) is important. This will ensure that your roof gets installed correctly and is protected. Visit https://redstickroofing.com/baton-rouge to learn more.

The first step in a proper roof installation is to remove the old one. Some homeowners try to save time and money by skipping this step, but it is essential to ensuring that your new roof will last for years to come. It also allows your roofing contractor to check for any underlying damage that may need to be addressed, such as leaks or the need for replacement roof decking.

If you’re doing the tear off yourself, prepare for a mess by covering any landscaping around the house with tarps, and renting a trash container for disposing of the debris as it is generated. If you have a lot of bushes or shrubbery around your home, protect them with 2×4 frames and cloth drop cloths, and lean plywood over any windows that might be exposed to falling shingle shards.

Once you’re ready to start, put on your safety gear, including a hard hat, work glasses, and gloves, and begin the process of removing shingles. It’s best to start at the top of the roof, using a shingle fork (or “shingle shovel”) to remove the ridge cap and then working down the rest of the roof, row by row. This is when you’ll want to be especially careful not to tear through the roof decking, as it can be expensive to replace. You should also be sure to keep pets indoors, as hammers and strangers tend to disturb dogs, cats, and even hamsters!

Selecting the Right Materials

Roofing materials can account for up to 40% of your total project cost, so it’s essential to decide which option is best for you. Some things to consider include:

What are the climate conditions where you live? Certain roof materials react differently to extreme weather conditions. For instance, if you live in a hot environment, you’ll want to choose a material that can reflect heat to save on energy bills, while homeowners in snowy areas will need to explore the durability of different options.

Also, pay attention to the maintenance requirements of each material you’re considering. Some require more work to keep them looking their best, while others are relatively low-maintenance.

Asphalt shingles are the most common choice because they’re inexpensive and easy to install. But don’t let this fool you—they’re not the most durable and will likely need replacement sooner than other materials.

Installing the Underlayment

Underlayment is a very important step in any roof installation. It catches and sheds water so that sheathing and framing underneath don’t get damp and rot. It also helps keep the shingles and metal roofing in place. There are many different types of underlayment, including foam, cork, and high-performance acoustic rubber. Most underlayment has a built-in moisture barrier. Foam underlayment is usually the cheapest, while cork and rubber underlayment are more expensive.

Contractors start by laying the underlayment, starting at the bottom of the roof and running it all the way up to the ridge. They may lay an ice and water barrier first, if it isn’t there already, to give the underlayment some added protection.

The underlayment should be rolled out evenly, but not stretched or tight. It should overlap the previous row by about 6 inches, and the seams must be properly sealed. A good sealant for this is roofing cement, but a good tape such as butyl rubber roofing tape will work just fine too.

When laying the underlayment, always follow the manufacturer’s instructions carefully. For example, some manufacturers recommend leaving a gap, about the width of a nickel, between each panel. This allows for expansion and contraction of the underlayment due to weather conditions. Some underlayments also have a printed anti-slip surface for workers to ensure that they aren’t slipping while working on the roof.

Flashing the Valleys

When rainwater pools in the roof valleys, it can seep into the underlying materials and lead to leaks. This can cause serious damage and costly repairs. Metal valley flashing prevents this from happening by directing the rainwater down the roof and away from the shingles.

There are two types of roof valley flashing: open and closed. Open valley flashing consists of V or W-shaped pieces of metal that run down the center of the valley. The sloping roof planes stop a few inches short of this centerline, leaving the valley open to channel water off the roof.

These metal flashing pieces are designed to be durable and long-lasting, protecting the roof from water damage for a very long time. They also offer less friction than shingles, so they won’t wear down as quickly. They can also be painted to match the shingles for a more aesthetically pleasing appearance.

If you’re considering installing open valley flashing, it’s important to get a high-quality product. Look for a minimum 28-gauge galvanized steel flashing that’s corrosion resistant and non-staining. Before you install the flashing, ensure that ice and water protector has been installed along the roof valley and that it has been tacked in place temporarily with asphalt plastic cement. Then, center the first piece of flashing in the roof valley and nail it down carefully, ensuring that the edges are overlapping by at least 6 inches (150 mm). Be sure not to use too many nails as this could increase the risk of leaks.

Capping the Ridge

Your roof’s peak is susceptible to damage, and the ridge cap is vital for safeguarding this area. Without it, moisture would work its way under the shingles or tiles at the peak and into your home. Over time, this could lead to unhealthy mold and mildew, rot, and other issues. Proper ridge capping protects against leaks and extends the life of your roof.

The ridge cap, also known as the roof cap, creates a waterproof barrier over the seam where two sides of your roof meet at the peak. A faulty ridge cap can allow water into your home, causing significant structural and financial damage. Poor installation or improper maintenance are common causes of ridge cap problems.

There are several types of ridge caps, but the most effective ones are made from asphalt shingles. They are durable, weather resistant, and affordable. They’re also highly regarded for their beauty and energy efficiency.

During the roof installation process, professionals use a special mortar mix to secure the ridge cap. However, this traditional method can be messy and expensive. Instead, Rescue My Roof professionals use mechanical clips to fasten the ridge cap. These clips are UV-stabilized and affixed to the ridge tiles or shingle with butyl strips, eliminating the need for mortar. They’re driven with care to ensure that they seat flat on the ridge – crooked screws won’t seal properly.

Installing the Shingles

Once the underlayment is in place and the valley flashing is complete, it’s time to install the shingles. This is a step that requires a high level of precision and attention to detail. If the shingles are installed incorrectly, they can allow water and other weather elements to penetrate the roof and cause damage. It is also important to nail the shingles properly in order to ensure they are secure and wind-resistant.

Start by carefully cleaning the work area. Remove any plant debris or other obstacles that could become tripping hazards. You should also cover any fragile plants with tarps to protect them from dropped tools and nails. Next, check the manufacturer’s recommendations on shingle installation. They’ll have specific instructions for how to line them up with each other and what nails are best to use.

Begin at the eaves and work your way to the ridge, taking care to overlap each row. Be sure to properly stagger the tabs, and always cover any exposed nails with a piece of shingle that is adjacent and over them. Finally, cap the ridge with specialized shingles designed to do so.

Once the shingles are installed, it’s time to perform one final inspection and clean up the work area. This is an excellent opportunity to ensure that there are no shingles that are crooked or missing, that the areas that require flashing are sealed and covered, and that your ridge cap looks seamless.

Roofing

Roofing – A Difficult Job That Requires Specialized Skills and Knowledge

Roofing In Williamsport are tasked with working on the topmost surface of buildings. This involves a lot of climbing and being exposed to the elements. They must be comfortable with heights and have a strong sense of balance.

Metal roofs have surged in popularity over the past 20 years. These cost more than shingles and require frequent recoating, but they last for decades and can add 6% to a home’s resale value.

Roofers

The roof is the topmost portion of a structure that protects the occupants of a building from rain, snow, sunlight, and extremes of temperature. It is also a feature that adds to the aesthetics of a building. A roof can be constructed of various materials, and it may take on a variety of shapes.

The basic components of a roof are the roof frame and the layers that go on top of it. The layer positioned directly on the roof frame is called the decking, which is made from plywood or oriented strand board (OSB). A roofing contractor will add an underlayment to the decking to provide extra protection against moisture.

These underlayments are felted or synthetic, protecting against water and other weather elements. These underlayments are installed between the wood decking and the shingles. The shingles are then installed over the felts or synthetic underlayment.

Another layer is the roof valley, a V-shaped channel or trough where two roof slopes meet. This feature is necessary to ensure that water drains properly off the roof. The next layer is the ridge cap, a flat shingle covering the roof valley’s top. It provides a finished look to the roof and seals the gaps between the shingles.

A roof can have many other features, such as a chimney, skylights, vent pipes, etc. Flashing is a metal sheet installed around these features to prevent water from seeping into the house. The roof can also be topped with plants, known as a green roof.

A soffit is the part of a roof located below the eaves and rakes. This is an important part of the roof because it allows for ventilation, which is essential to keeping the interior of a home cool. A soffit also helps to reduce the risk of mold and mildew. Finally, a roof can have gutters to collect and carry away rainwater from the house.

The materials used in constructing a roof can significantly impact a home’s cost, life span, and energy costs. When choosing the roofing material for your new home or a re-roofing project, it is important to consider these issues and the roofing contractor you use for the work.

Shingles, made from asphalt, wood, clay, or slate, are the most recognizable roof parts and provide protection and a beautiful decorative element. When properly installed by a qualified roofing contractor, shingles offer an excellent barrier between your home and the elements, lasting 30 years or more.

Most shingle roofing is built from a series of ply sheets held together by either a fiber or glass mat, with bitumen sandwiched in between. The type of bitumen used varies and is often either coal tar or asphalt. In some cases, the bitumen is pre-applied to the ply sheet to reduce installation time and cost; in other cases, it’s applied using a hot or cold application method.

Single-membrane systems like EPDM rubber or thermo-polyolefin (TPO) are popular for flat or low-slope roofing. Though these membranes are durable and can be used on all roofs, they are most effective on flat or shallow-sloped roofs.

Metal roofing is another common option, with standing seam and corrugated roofs being the most popular styles. This type of roofing is typically less expensive than a shingle roof and offers better insulation values.

A more traditional choice is wood shingles, which offer a rich aesthetic that can add to the value of your home and are a great alternative to asphalt shingles for those who prefer a more natural look. However, they are susceptible to moss growth and require regular maintenance to ensure they remain in good condition.

Concrete and clay tiles are also available, offering a more eco-friendly option that is both durable and aesthetically pleasing. These are usually baked at high temperatures to create a long-lasting, weather-resistant roof.

Roofing is a difficult job that requires specialized skills, knowledge of safety protocols, and the ability to handle heavy materials at potentially dangerous heights. It’s also very time-consuming. We recommend hiring a professional roofing contractor for a DIY project. They’ll walk you through the steps and address any questions or concerns you may have along the way. This will save you time and money in the long run!*

*APR based on credit approval. See terms and conditions.

A roof is vital to any structure and requires regular maintenance to ensure it functions properly. Keeping up with simple tasks like sweeping debris off the roof’s surface, cleaning gutters and downspouts, and power washing areas showing signs of moss growth can help prevent small problems from becoming big. Another important task is trimming tree branches that hang over the roof. This can protect it during heavy storms by preventing branches from breaking and falling on the roof or hitting shingles.

Having a professional roofer inspect the roof regularly is also a good idea. A reputable contractor can spot potential problems before they become serious and save you money in the long run. It’s an investment that will pay for itself as time goes by and can protect your home from costly repairs in the future. Remember the adage, “An ounce of prevention is worth a pound of cure.” This is especially true when it comes to your roof. So take care of it and enjoy the benefits it provides!

Roofers work in residential and commercial settings to build, repair, or assess the integrity of roofs. They must be able to follow construction standards, purchase the right materials, and perform their tasks safely. Typically, these professionals are employed with general contractors or roofing companies that specialize in the repair and construction of roofs. Some roofers can advance their careers by gaining advanced degrees and becoming supervisors of more junior roofers.

This is a physically demanding job requiring the ability to stand, walk, and climb for long periods. It can also be dangerous, as roofers are exposed to high heat and humidity levels. Many people find that the demands of this job cause them to develop health issues such as fatigue and sore muscles. However, roofers can make good money for their efforts, especially if they join a union and receive the negotiated benefits that come with it.

One of the best things about being a roofer is seeing your hard work daily. This can be quite motivating, as many other professions regularly offer something other than this kind of tangible progress. Additionally, you can enjoy fresh air daily while working as a roofer, which many other jobs cannot provide.

Roofers are in high demand, so plenty of work is available for them. It is a good choice for people who enjoy working outdoors and are looking for steady work that will allow them to retire comfortably when ready. However, it is important to remember that a roofer’s salary is low compared to other professions.

Many people who choose to become rooers find that they cannot afford other forms of employment, such as office work or teaching. This can be problematic if you want to start a family one day, as you must have enough income to support your children. Additionally, buying a house or car with a roofer’s salary may be difficult.